1. Topic
1.1 Introduction
Due to the success of our first technical article which can be found here we decided to continue. This time we will take a look at how an integration between Exchange and Salesforce can be achieved in a most simple way. We will use SQL queries.
For the integration we use CB Linked Server for Enterprise Applications. Ask us for a free trial of the product.
2. Scenario Requirements
The integration scenario required here is to synchronize between a local database contacts table, Exchange 365 contacts and SalesForce contacts and to have an immediate replication from the local database table to those 2 target systems. This could be useful to have a backup of contacts offline or to create a data warehouse or for some other reasons.
3. Basic Workflow
3.1 Configure CB Query Analyzer
First step, is to ensure that you are able to connect to the target system (Exchange & SalesForce in our scenario); easiest way to do that is via CB Query Analyzer. Here I already configured my ConnectBridge server via the Administration tool to connect to MS Exchange 365 and to SalesForce by creating the required groups and users. I created a username called “martin” with password “1234”. This user is having rights to connect to Exchange 365 and SalesForce. Now from Query Analyzer I will create 2 connections to each target system and ensure that I can connect successfully.
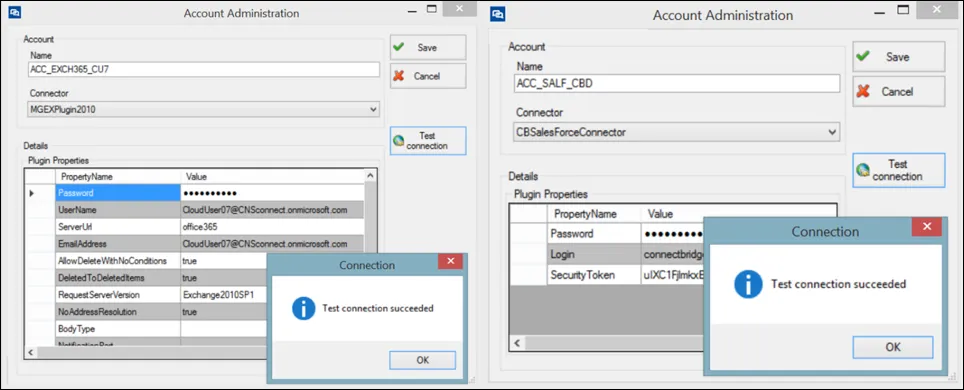
Figure 1: Accounts Administration
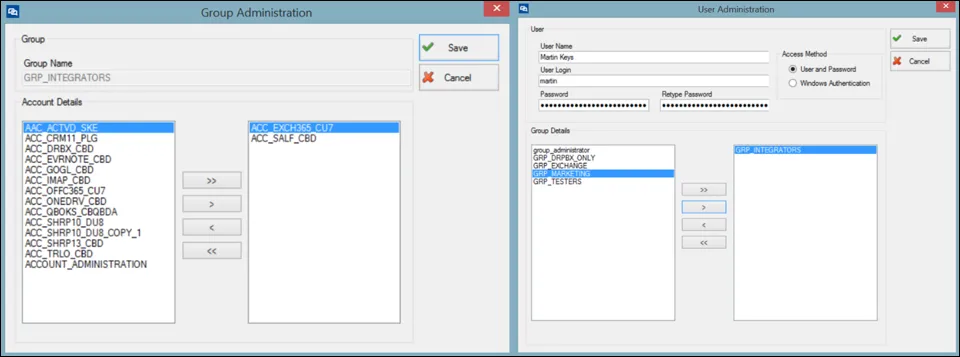
Figure 2: Group & User Administration
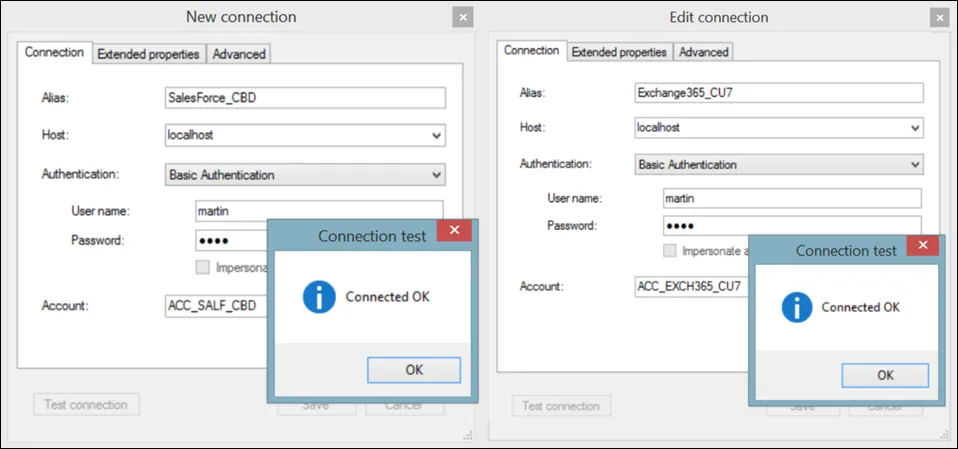
Figure 3: Query Analyzer Connections
3.2 Test your Statements
As shown above we have a successful configuration and connection to both target systems. Now we can test our statements
3.2.1 Exchange Contacts
On my Exchange account, I have 3 contacts as shown below
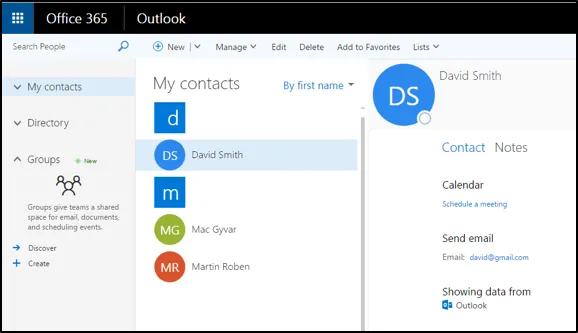
Figure 4: Exchange Contacts
Now we are going to test the 4 basic operations SELECT, INSERT, UPDATE & DELETE
1. Selecting contacts
Executing the below statement should give us the 3 contacts shown in Figure 5.
SELECT [GivenName],[SurName],[Email1EmailAddress] FROM [Contact];
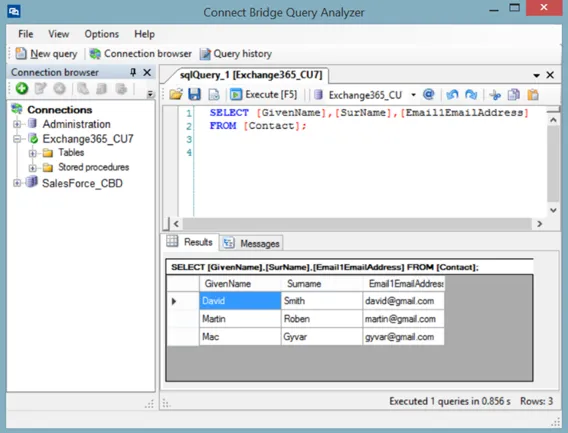
Figure 5: Selecting Contacts
2. Inserting a contact
Executing the below statement should insert a new contact shown in Figure 6
INSERT INTO Contact([GivenName],[SurName],[Email1EmailAddress]) VALUES ('Peter','K.', 'peter@gmail.com');
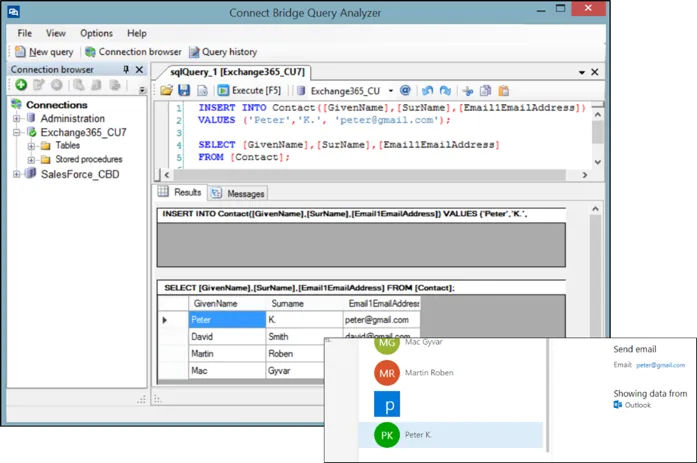
Figure 6: Inserting New Contact
3. Updating a contact
Executing the below statement should update the last name of the contact we inserted earlier as shown in Figure 7
UPDATE Contact SET [SurName] = 'Keys' WHERE [Email1EmailAddress] LIKE 'peter@gmail.com';
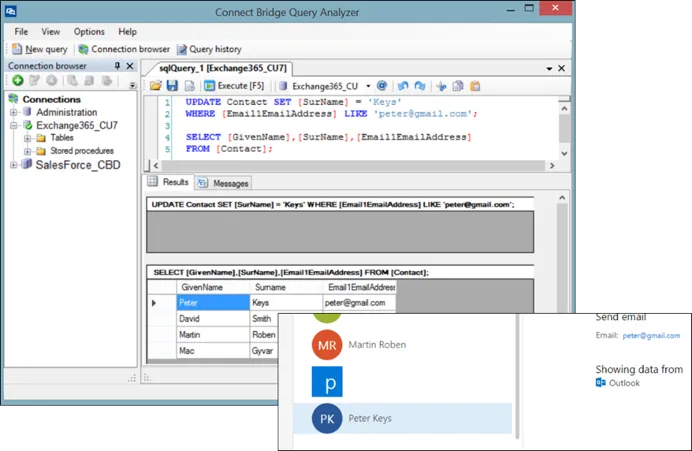
Figure 7: Updating Contact
4. Deleting a contact
Executing the below statement should delete the newly inserted contact as shown in Figure 8
DELETE FROM Contact WHERE [Email1EmailAddress] LIKE 'peter@gmail.com';
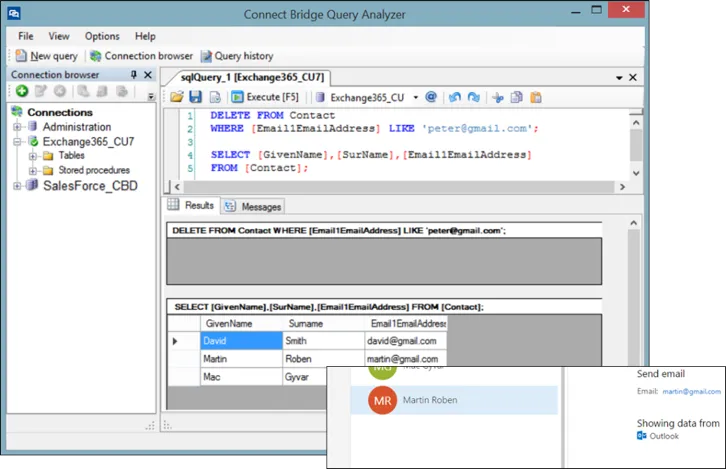
Figure 8: Deleting Contact
3.2.2 Salesforce Contacts
On my SalesForce account, I have 17 contacts as shown below
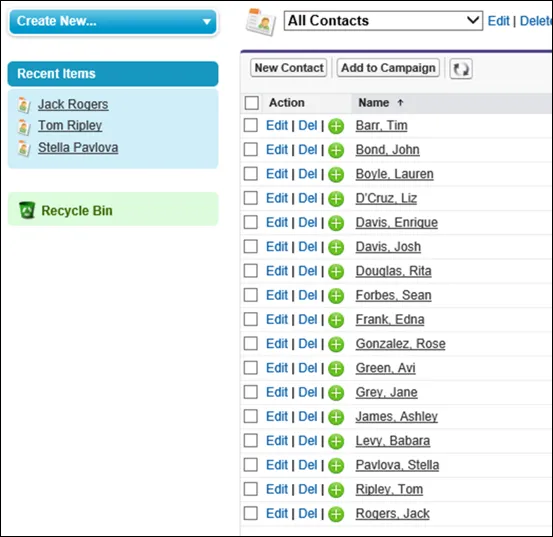
Figure 9: SalesForce Contacts
Now we are going to test the same 4 basic operations SELECT, INSERT, UPDATE & DELETE.
1. Selecting contacts
Executing the below statement should give us the 17 contacts shown in Figure 10.
SELECT [FirstName],[LastName],[Email] FROM [Contact];

Figure 10: Selecting Contacts
2. Inserting a contact
Executing the below statement should insert a new contact shown in Figure 11
INSERT INTO Contact([Firstname],[LastName],[Email]) VALUES ('Peter','K.', 'peter@gmail.com');
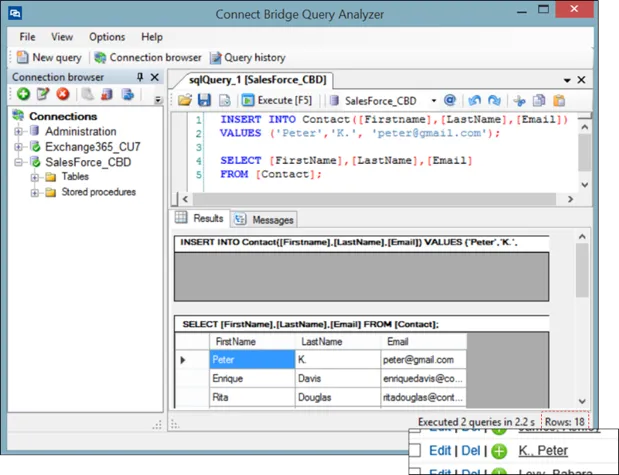
Figure 11: Inserting New Contact
3. Updating a contact
Executing the below statement should update the last name of the contact we inserted earlier as shown in Figure 12
UPDATE Contact SET [LastName] = 'Keys' WHERE [Email] = 'peter@gmail.com';
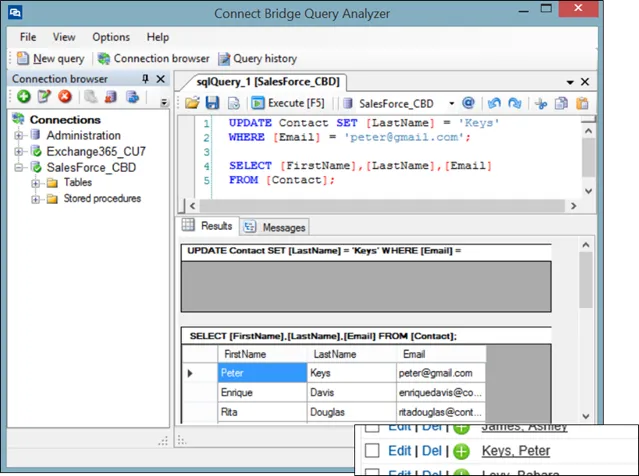
Figure 12: Updating Contact
4. Deleting a contact
Executing the below statement should delete the newly inserted contact as shown in Figure 13
DELETE FROM Contact WHERE [Email] = 'peter@gmail.com';
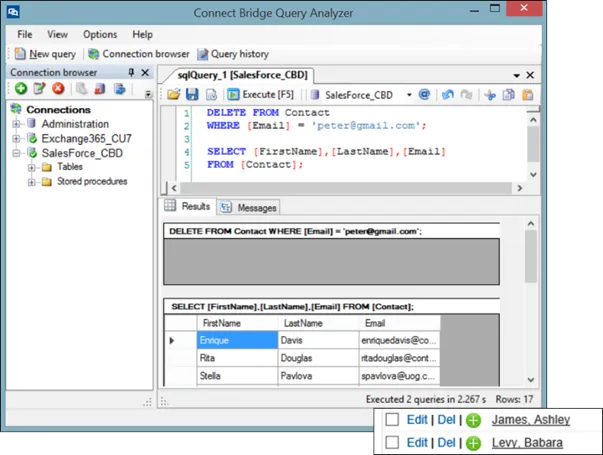
Figure 13: Deleting Contact
3.3 Copy Connection and Statements
Now we know that we are able to select, update, insert and delete contacts from Exchange & SalesForce. What we need do now is to copy the connection string from Query Analyzer and our tested statements to use them later in our MS SQL Server Solution.
To copy the connection from query analyzer, we just need to right click the connection, click Edit and go to Advanced tab and copy the text from there as shown below in Figure 14.
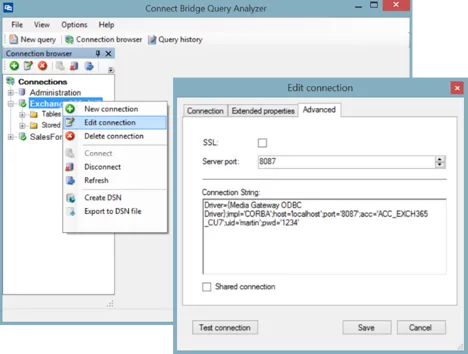
Figure 14: Copying connection string from Query Analyzer
Here are my connection strings for both target systems.
Exchange
Driver={Media Gateway ODBC Driver};impl='CORBA';host='localhost';port='8087';acc='ACC_EXCH365_CU7';uid='martin';pwd='1234'
SalesForce
Driver={Media Gateway ODBC Driver};IMPL=CORBA;HOST='localhost';PORT='8087';ACC='ACC_SALF_CBD';UID='martin';PWD='1234'
Now we are ready to open MS SQL Server and start implement our SQL Server integration solution.
4. Solution Walkthrough
4.1 MS SQL Server
To be able to work with external data sources via SQL Server Linked Server feature, we need to do the following configurations
1. Start Microsoft SQL Server Management Studio and login using either windows authentication or username and password as shown below in Figure 15
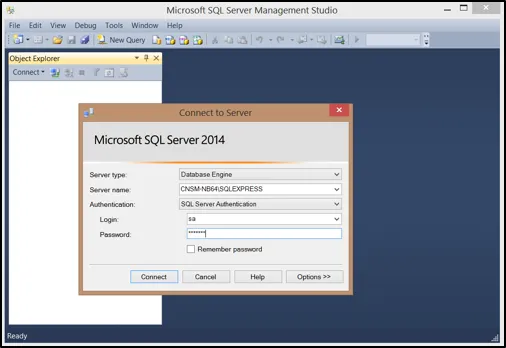
Figure 15: MS SQL Server Management Studio Login Screen
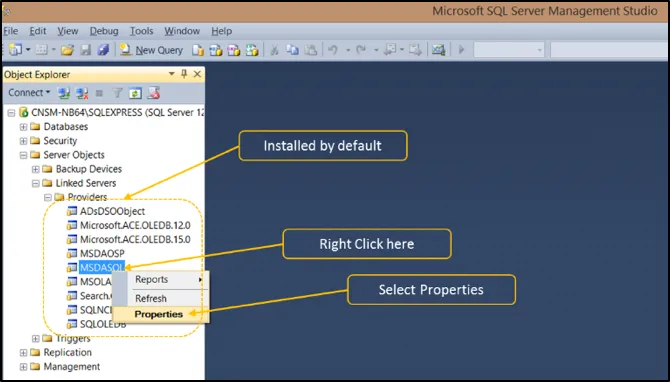
Figure 16: MSDASQL Properties
2. Navigate to Sever Objects -> Linked Servers -> Providers -> MSDASQL by expanding the corresponding nodes as shown above in Figure 16. Right click on MSDASQL – Microsoft Data Access SQL – and select Properties to show the dialog in Figure 17
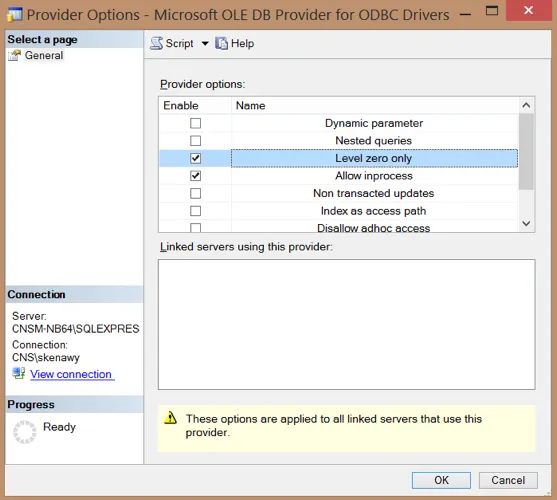
Figure 17: MSDASQL Properties Settings
3. We have to ensure that the following settings/options are checked:
a. Level zero only: For security reasons we have to ensure that only OLE DB providers that are compliant with level 0 OLE DB interface are supported.
b. Allow inprocess: to allow the data provider(s) – “external data sources” – to be instantiated as an in-process server – “in the same process as MS SQL Server”. We need to do that to avoid passing authentication information between MS SQL Server and the Provider and to be able to work with datatypes like (varchar(max), nvarchar(max), varbinary(max), text, ntext, or image). Without enabling this option, we won’t be able get a data of type image from Exchange - for example - and insert it in our MS SQL Server Database.
4. Now we need to enable MS SQL Server to connect to external providers and execute queries to query data from external providers that use OLEDB – let’s call them “External OLEDB Data Sources”. We will do that in 3 steps:
a. We need to open a new Query window by clicking the New Query button as shown in Figure 18 below. It doesn’t matter which database is active, because what we are going to do is going to affect the entire MS SQL Server installation and in turn each and every database in there. As show below I have “master” as the active/target database
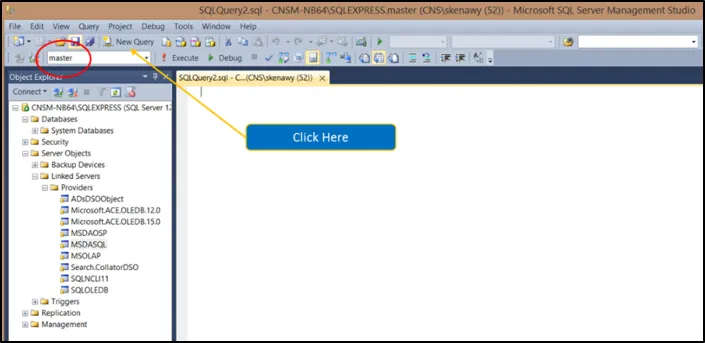
Figure 18: MS SQL Server Query Analyzer
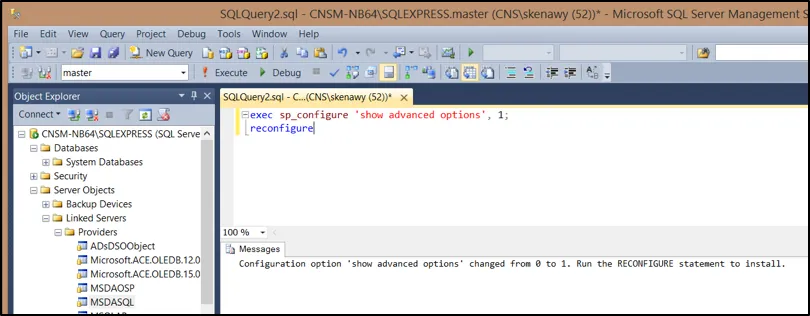
b. We need to reconfigure MS SQL Server so that we can change/configure its advanced options. To do that we are going to execute a stored procedure called “sp_configure” – it’s a preinstalled system stored procedure - and we are going to specifically “show advanced options” – by setting this option to 1. To do that we type “exec sp_configure 'show advanced options', 1; reconfigure” and press F5 to execute. If everything goes right, you should get a message similar to the message in Figure 19 below
Figure 19: MS SQL Server - Showing Advanced Options
c. Now we need to allow MS SQL Server to query those “External OLEDB Data Sources” using something called “Ad Hoc Distributed Queries”. By default, MS SQL Server doesn’t allow the “Ad Hoc Distributed Queries” therefore we need to reconfigure this advanced option – that’s why we did the previous step – by executing the stored procedure “sp_configure” passing the setting “Ad Hoc Distributed Queries” and the value 1 to enable it. If everything goes right, you should get a message similar to the message in Figure 20 below after executing “exec sp_configure 'Ad Hoc Distributed Queries', 1; reconfigure”
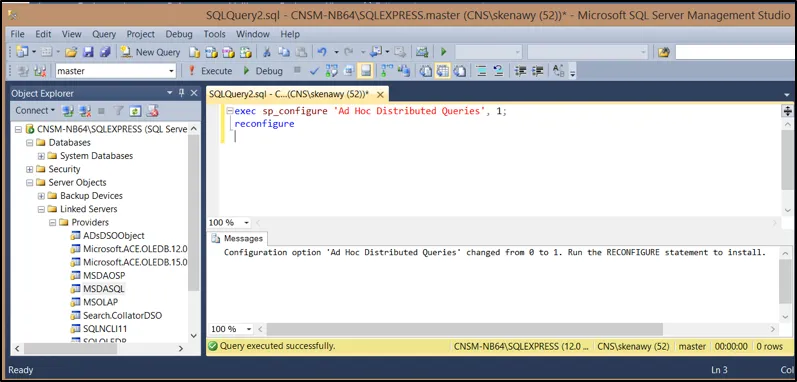
Figure 20: MS SQL Server - Enabling Ad Hoc Distributed Queries
Now we can add as many Linked Server as we want, since our MS SQL Server is properly configured to allow that.
4.2 Configuring MS Exchange Linked Server
1. Navigate to Sever Objects -> Linked Servers. Right click on Linked Servers and choose New Linked Server as shown in the Figure 21 below

Figure 21: MS SQL Server - Adding New Linked Server
2. In the new Linked Server dialog, as shown in Figure 22 below, you need to provide the following:
a. Linked Server name: could be any valid name, I choose Exchange365_CU7.
b. Provider: must be “Microsoft OLE DB Providers for ODBC Drivers”, as ConnectBridge is using ODBC.
c. Provider String: here we paste the connection string we copied earlier from query Analyzer.
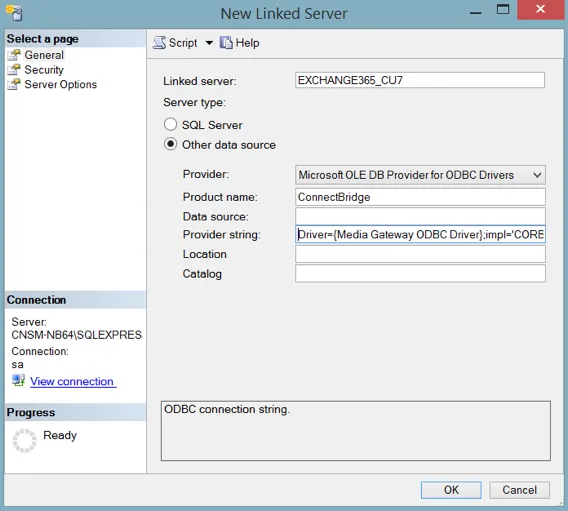
Figure 22: MS SQL Server - Configuring New Linked Server - General
3.Now we need to establish a relationship between the user using/accessing MS SQL Server and the user using/accessing CB. The user using MS SQL Server is called Local Login (in our scenario it’s “sa”) and the user using/accessing CB is called Remote User (in our scenario it’s Martin with login martin). This is what we have to configure, and to do that we click “security” tab to show the dialog in Figure 23 below
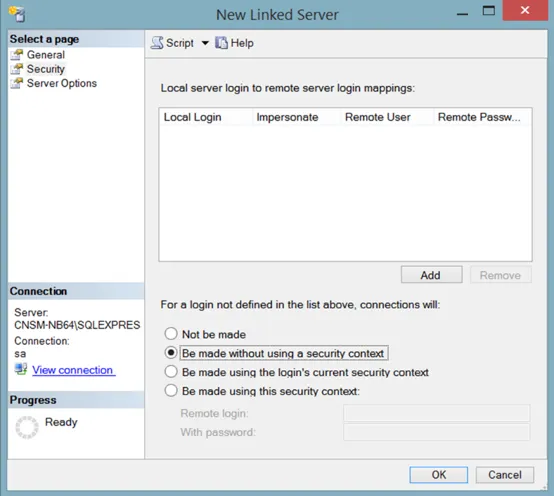
Figure 23: MS SQL Server - Configuring New Linked Server - Security
4. When the above dialog is displayed, we click the Add button and we type in the Local Login and the Remote User as we agreed. That’s what I did here in Figure 24
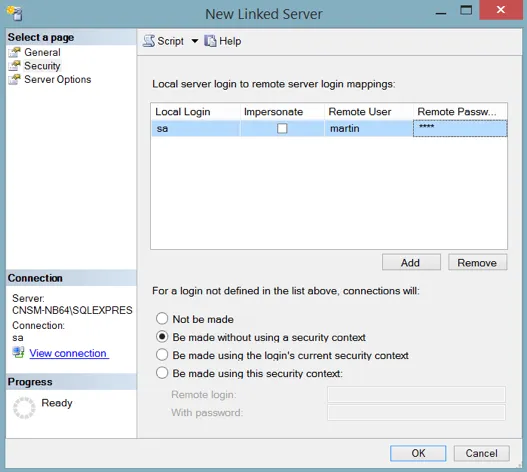
Figure 24: MS SQL Server - Configuring New Linked Server - Logins
5. Okay I know you want to close the dialog but wait! we need to do one more step. Now we need to go to “Server Options” tab on the left hand side to show the dialog in Figure 25 below and enable 2 features
a. RPC: to enable a certain security feature which we would need when we use some legacy feature called Remote Server – don’t worry about it now – so that login validation between CB and MS SQL Server is possible
b. RPC Out: to enable “Remote Procedure Call” feature, as we need to allow our stored procedures to be able to run remotely
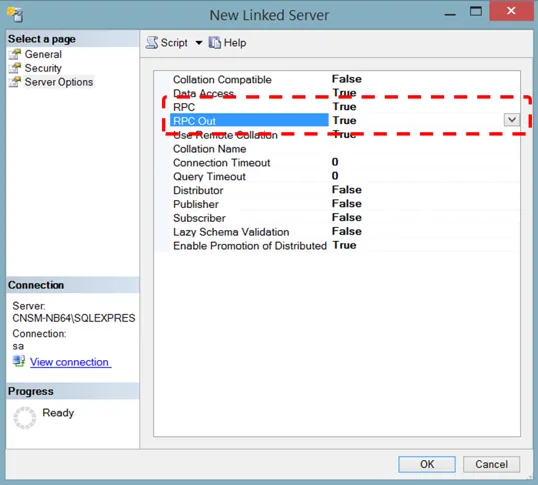
Figure 25: MS SQL Server - Configuring New Linked Server - Server Options
6. Now we click okay and we are done! Yes! We configured MS SQL Server to connect to Exchange. Now we can see Exchange platform as a database in MS SQL Server, we can see table called Contacts, we can show a list of contacts from Exchange, all this, without accessing Exchange database as you could see in Figure 26 below
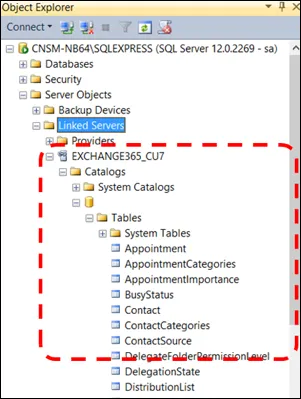
Figure 26: MS SQL Server - Linked Server Configured Successfully
4.3 Testing MS Exchange Linked Server
Before developing our integration solution, we need to be sure that we are able to perform the Basic Data manipulation on MS Exchange via our newly configured Linked Server.
1. Selecting contacts
Executing the below statement should give us the 3 contacts from MS Exchange.
SELECT GivenName, SurName, Email1EmailAddress FROM EXCHANGE365_CU7...Contact;
Why the “…”? Because it follows the syntax SERVER.DATABASE.SCHEMA.TABLE and as you could see from Figure 26 above, our Server is Exchange365_CU7, our database is “without name” our schema is “without name” and finally our table is Contacts.
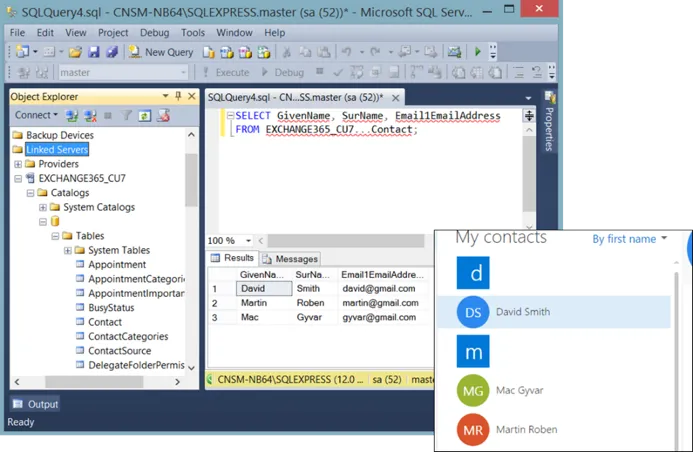
Figure 27: Selecting Contacts
2. Inserting a contact
Executing the below statement should insert a new contact.
EXEC ('INSERT INTO Contact([GivenName], [SurName], [Email1EmailAddress])
VALUES ("Peter", "K.", "peter@gmail.com");') AT EXCHANGE365_CU7;
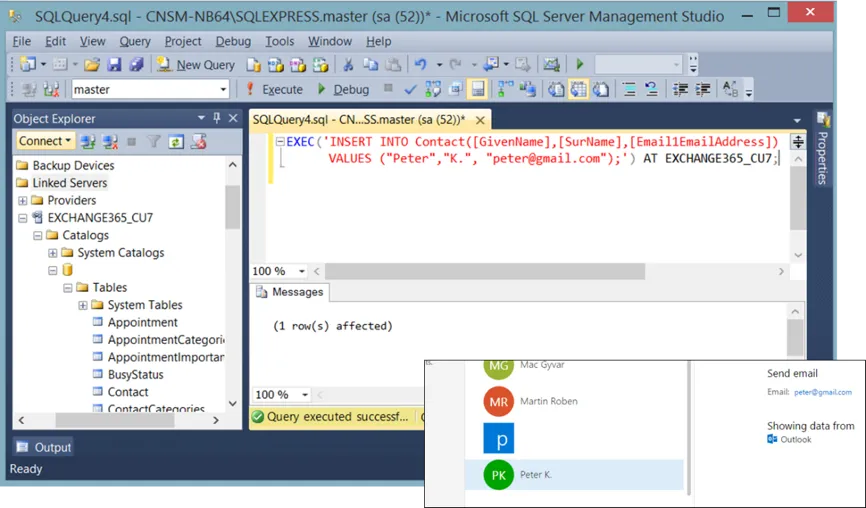
Figure 28: Inserting New Contact
3. Updating a contact
Executing the below statement should update the last name of the contact we inserted earlier
EXEC('UPDATE Contact SET [SurName] = "Keys" WHERE [Email1EmailAddress] LIKE
"peter@gmail.com";') AT EXCHANGE365_CU7;
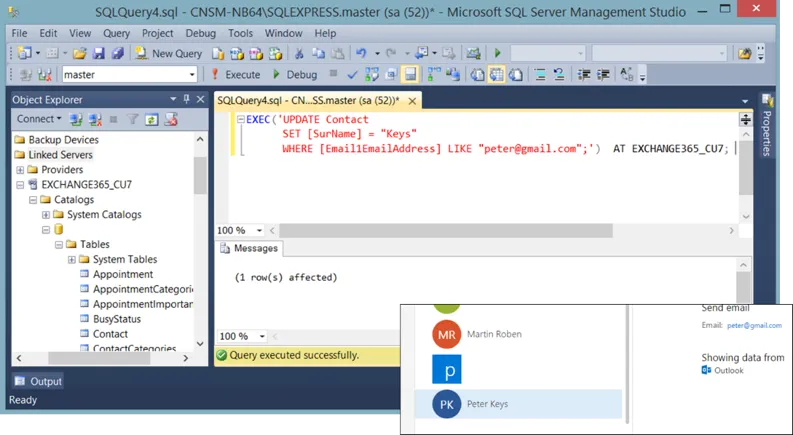
Figure 29: Updating Contact
4. Deleting a contact
Executing the below statement should delete the newly inserted contact
EXEC ('DELETE FROM Contact WHERE [Email1EmailAddress] LIKE
"peter@gmail.com";') AT EXCHANGE365_CU7;
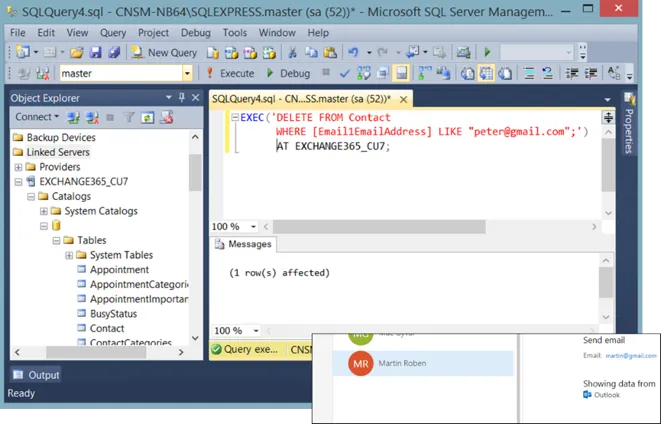
Figure 30: Deleting Contact
4.4 Configuring SalesForce Linked Server
We are going to follow the steps from section “4.2 Configuring MS Exchange Linked Server” except of course we are going to use the Connection String for SalesForce. After following those steps, your Linked Server should be configured successfully as shown below.
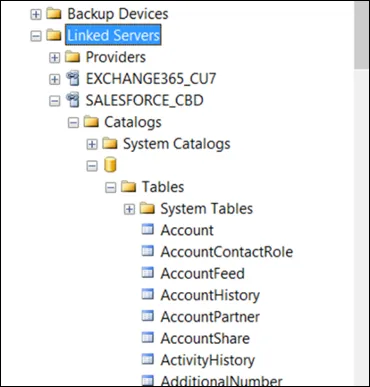
Figure 31: SalesForce Linked Server Configured Successfully
4.5 Testing Salesforce Linked Server
As we did before also with MS Exchange Linked Server, we need to ensure that we are able to perform the Basic Data Manipulation tasks via the SalesForce Linked Server.
For shorten the guide, Figure 32 below is testing all the following statements
1. Selecting contacts
Executing the below statement should give us the contacts from SalesForce.
SELECT GivenName, SurName, Email1EmailAddress FROM EXCHANGE365_CU7...Contact;
2. Inserting a contact
Executing the below statement should insert a new contact.
EXEC ('INSERT INTO Contact([GivenName], [SurName], [Email1EmailAddress])
VALUES ("Peter", "K.", "peter@gmail.com");') AT EXCHANGE365_CU7;
3. Updating a contact
Executing the below statement should update the last name of the contact we inserted earlier
EXEC('UPDATE Contact SET [SurName] = "Keys" WHERE [Email1EmailAddress] LIKE
"peter@gmail.com";') AT EXCHANGE365_CU7;
4. Deleting a contact
Executing the below statement should delete the newly inserted contact
EXEC ('DELETE FROM Contact WHERE [Email1EmailAddress] LIKE
"peter@gmail.com";') AT EXCHANGE365_CU7;

Figure 32: Testing SalesForce Linked Server
4.6 Local Database table
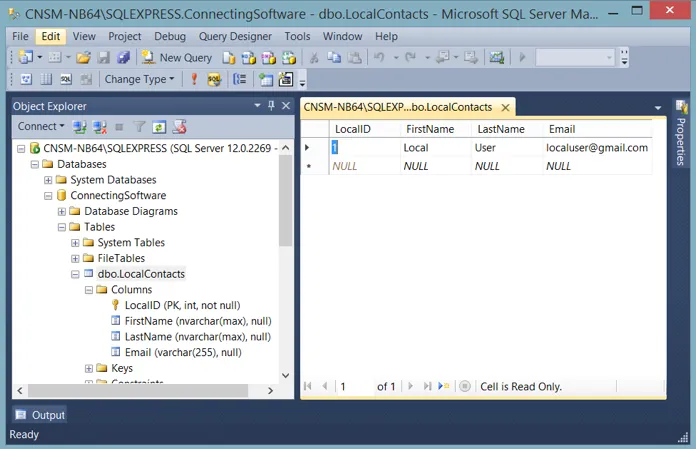
From here, we need to have an actual local database on our Local MS SQL Server. If you already have one, then you could use otherwise we need to create a new Database. I created a Database called ConnectingSoftware with 1 table called LocalContacts. In that table there is only one record as shown below in Figure 33.
Figure 33: Local Contacts Table
4.7 Replication Table trigger
The first step in our solution is to replicate the changes in our Local database table to both SalesForce and Exchange. we are going to implement this via table trigger.
SQL Script for the trigger is shown below:
CREATE TRIGGER [dbo].[trgSyncContact]
ON [dbo].[LocalContacts]
AFTER INSERT, UPDATE, DELETE
AS
BEGIN
declare @Operation varchar(50)
declare @FirstName nvarchar(max)
declare @LastName nvarchar(max)
declare @Email varchar(255)
declare @Deleted_FirstName nvarchar(max)
declare @Deleted_LastName nvarchar(max)
declare @Deleted_Email varchar(255)

IF COLUMNS_UPDATED() > 0
BEGIN
--if we have updated columns, then we either inserted or deleted a
record
IF EXISTS (SELECT * FROM DELETED)
BEGIN
--if we have deleted values, then it was an update operation
SELECT @FirstName = inserted.FirstName, @LastName =
inserted.LastName, @Email = inserted.Email,
@Deleted_FirstName = deleted.FirstName,
@Deleted_LastName = deleted.LastName, @Deleted_Email =
deleted.Email
FROM deleted, inserted
--SalesForce
Exec ('UPDATE Contact SET FirstName = ?, LastName = ?, Email = ?
WHERE FirstName = ? and LastName = ? and Email = ?',
@FirstName, @LastName, @Email, @Deleted_FirstName,
@Deleted_LastName, @Deleted_Email) at SALESFORCE_CBD;
--Exchange
EXEC ('UPDATE Contact SET GivenName = ?, SurName = ?,
Email1EmailAddress = ? WHERE GivenName = ? and SurName =
? and Email1EmailAddress = ?', @FirstName, @LastName,
@Email, @Deleted_FirstName, @Deleted_LastName,
@Deleted_Email) at EXCHANGE365_CU7;
END
ELSE
BEGIN
--if it wasn't update operation, then it was insert
SELECT @FirstName = FirstName, @LastName = LastName, @Email =
Email
FROM inserted
--SalesForce
Exec ('Insert into Contact (FirstName, LastName, Email) values
(?,?,?)', @FirstName, @LastName, @Email) at
SALESFORCE_CBD;
--MS Exchange
EXEC ('Insert into Contact (GivenName, SurName,
Email1EmailAddress) values(?,?,?)', @FirstName,
@LastName, @Email) at EXCHANGE365_CU7;
END
END
ELSE
BEGIN
--if the operation was not update/insert then it was delete
SELECT @Deleted_Email = Email FROM deleted
--SalesForce
Exec ('Delete From Contact Where Email = ?', @Deleted_Email) at
SALESFORCE_CBD;
--MS Exchange
Exec ('Delete From Contact Where Email1EmailAddress = ?',
@Deleted_Email) at EXCHANGE365_CU7;
END
END
Warning: after executing the above script, we shouldn’t insert anything from the local database table until we synchronize between our 2 target systems (Exchange and SalesForce) and our Local database, otherwise we could end up in accidentally duplicating records since the logic here doesn’t check if a new record already existed on those target systems.
4.8 Synchronization Stored Procedure
The second step in our solution is to synchronize between MS Exchange, SalesForce and our Local Contacts table, so that each system will have the same set of contacts.
To do that we are going to write a stored procedure. The logic of the procedure is to:
1. Very important to disable the trigger we created above “as we are doing the synchronization, we must not enable the automatic replication implemented by the trigger”
2. Synchronize between SalesForce & my database
Using contact’s email address as a matching key; Is there a contact on SalesForce and not in my Local Contacts table?
a. Yes: Add contact to my Local Contacts Table
b. No: Update contact’s First Name and Last Name in my Local Contacts Table
3. Synchronize between MS Exchange & my database
Using contact’s email address as a matching key; Is there a contact on Exchange and not in my Local Contacts table?
a. Yes: Add contact to my Local Contacts Table
b. No: Update contact’s First Name and Last Name in my Local Contacts Table
At this point, my local Contacts table is having all contacts from both SalesForce and MS Exchange in addition to the records that were originally in the table. Now we need to update each target system by the contacts from the other target system and the Local database
4. Update contacts on SalesForce (by contacts from Exchange & my local table)
Using contact’s email address as a matching key; Is there a contact in my Local Contacts table and not on SalesForce?
a. Yes: Add contact to SalesForce
b. No: Update contact’s First Name and Last Name on SalesForce
5. Update contacts on Exchange (by contacts from SalesForce & my local table)
Using contact’s email address as a matching key; Is there a contact in my Local Contacts table and not on Exchange?
a. Yes: Add contact to MS Exchange
b. No: Update contact’s First Name and Last Name on Exchange
6. Now, we can enable the trigger we disabled earlier, so the automatic replication is back ON.
The following SQL script will implement the logic discussed above
CREATE PROCEDURE [dbo].[uspInitSync]
-- Add the parameters for the stored procedure here
AS
BEGIN
-- SET NOCOUNT ON added to prevent extra result sets from
-- interfering with SELECT statements.
SET NOCOUNT ON;

--disable trigger so that, while inserting from SalesForce we don't endup in
--adding the contacts again to SalesForce
DISABLE TRIGGER [trgSyncContact] ON LocalContacts;

--merge records from SalesForce to LocalDB
DECLARE @ImportedContacts Table(FirstName nvarchar(max), LastName
nvarchar(max), Email varchar(255));

--update / insert contacts in LocalDB using SalesForce as source
MERGE LocalContacts AS target
USING (SELECT FirstName, LastName, Email FROM SalesForce_CBD...Contact)
AS source
ON (target.Email LIKE source.Email)
WHEN MATCHED THEN
UPDATE SET FirstName = source.FirstName, LastName =
source.LastName
WHEN NOT MATCHED THEN
INSERT (FirstName, LastName, Email)
VALUES (source.FirstName, source.LastName, source.Email)
OUTPUT inserted.FirstName, inserted.LastName, inserted.Email
INTO @ImportedContacts;

--show inserted contacts in LocalDB from SalesForce
select * from @ImportedContacts;

--update / insert contacts in LocalDB using Exchange as source
MERGE LocalContacts AS target
USING (SELECT GivenName, SurName, Email1EmailAddress FROM
EXCHANGE365_CU7...Contact) AS source
ON (target.Email LIKE source.Email1EmailAddress)
WHEN MATCHED THEN
UPDATE SET FirstName = source.GivenName, LastName =
source.SurName
WHEN NOT MATCHED THEN
INSERT (FirstName, LastName, Email)
VALUES (source.GivenName, source.SurName,
source.Email1EmailAddress)
OUTPUT inserted.FirstName, inserted.LastName, inserted.Email
INTO @ImportedContacts;

--display inserted contacts using table variable
select * from @ImportedContacts;

--now copy everything to SalesForce & Exchange so they will have exact copy
--from LocalDB after LocalDB is sync with all systems
--I have to use cursour and if because using insert....select....where not
--exists didn't work with remote tables and also merge doesn't work with
--remote tables
Declare @FirstName nvarchar(max)
declare @LastName nvarchar(max)
declare @Email varchar(255)
declare @SQL nvarchar(max)

DECLARE Contacts_cursor CURSOR FAST_FORWARD FOR
SELECT FirstName, LastName, Email from LocalContacts;

OPEN Contacts_cursor
FETCH NEXT FROM Contacts_cursor INTO @FirstName, @LastName, @Email
WHILE @@FETCH_STATUS = 0
BEGIN
IF EXISTS (SELECT Email1EmailAddress FROM EXCHANGE365_CU7...Contact
WHERE Email1EmailAddress LIKE @Email)
EXEC ('UPDATE Contact SET GivenName = ?, SurName = ? WHERE
Email1EmailAddress = ?', @FirstName, @LastName, @Email)
at EXCHANGE365_CU7;
ELSE
EXEC ('Insert into Contact (GivenName, SurName,
Email1EmailAddress) values(?,?,?)', @FirstName,
@LastName, @Email) at EXCHANGE365_CU7;

IF EXISTS (SELECT Email FROM SalesForce_CBD...Contact WHERE Email LIKE
@Email)
Exec ('UPDATE Contact SET FirstName = ?, LastName = ? WHERE
Email = ?', @FirstName, @LastName, @Email) at
SalesForce_CBD;
ELSE
Exec ('Insert into Contact (FirstName, LastName, Email) values
(?,?,?)', @FirstName, @LastName, @Email) at
SalesForce_CBD;

FETCH NEXT FROM Contacts_cursor INTO @FirstName, @LastName, @Email
END
CLOSE Contacts_cursor;
DEALLOCATE Contacts_cursor;

--enable trigger so that any modification is reflected in online LOB
ENABLE TRIGGER [trgSyncContact] ON LocalContacts;
END
5. Solution in Action
Now first step is to run the synchronization stored procedure “uspInitSync” as shown below, the stored procedure was executed without errors.
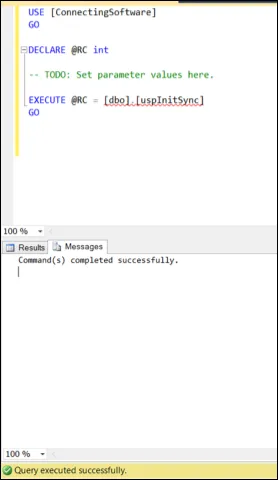
Figure 34: running the synchronization stored procedure
We could also see that there were new contacts added to MS Exchange
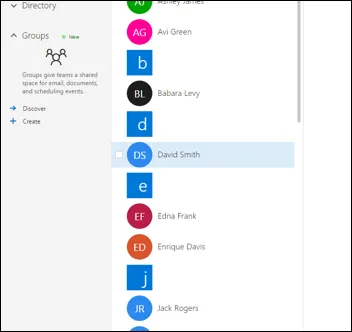
Figure 35: Updates on MS Exchange
And new contacts added to SalesForce
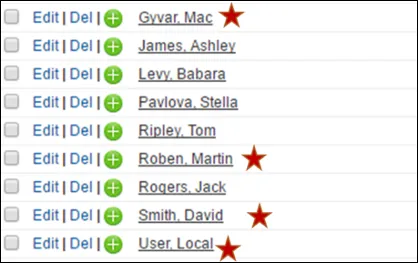
Figure 36: Updates on SalesForce
And our local database table now is having new contacts
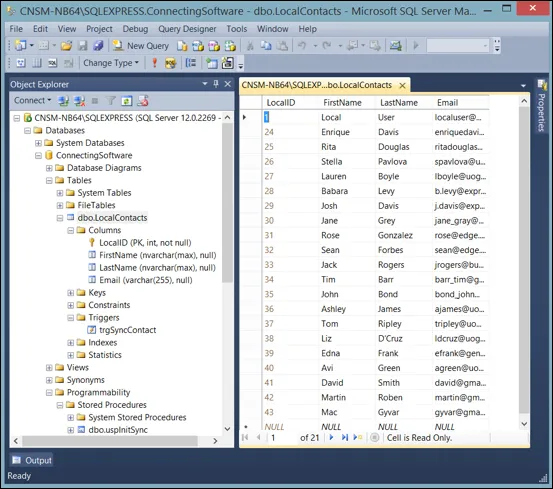
Figure 37: Updates in Local Contacts table
We can see the automatic replication in action as well
1. Inserting contact from local database, deletes it from SalesForce and Exchange
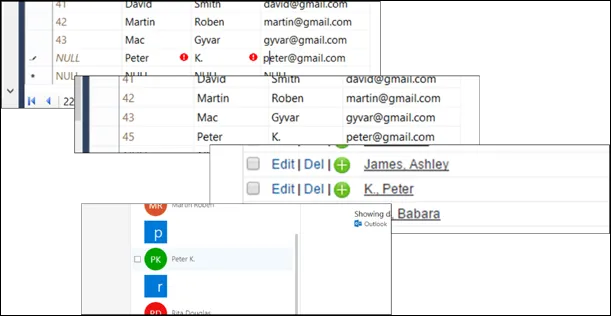
Figure 38: Insert Replication
2. Updating contact in local database updates it in SalesForce and Exchange
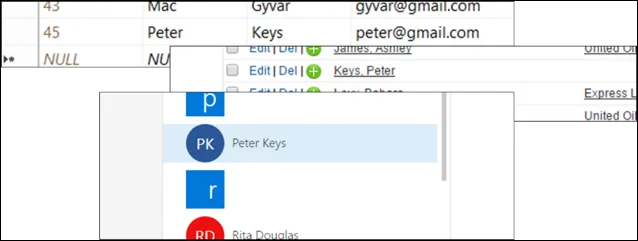
Figure 39: Update Replication
3. Deleting contact from local database, deletes it from SalesForce and Exchange
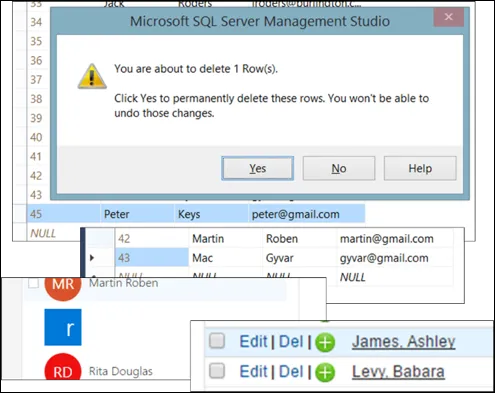
Figure 40: Delete Replication
6. Notes on Solution
We tried to keep the solution logic as much simple as possible, however the logic could be further improved & tweaked for better performance and more complex features.
You can find more info about this product on the product page of CB Linked Server for Enterprise Applications.