"Have you ever wondered how to access Microsoft SharePoint in your Python scripts?
This tutorial addresses just that:
you will be able to do it in an easy way by using a tool called Connect Bridge."
Introduction
This article describes how to make Python connect to SharePoint, that is, how to access data of Microsoft SharePoint systems (2010, 2013 or 2019) from within Python language scripts (using version 3.7). The data transfers are made via the ODBC layer. We have achieved this in Python using the pyodbc module ver. 4.0.26.
It is important to note that in this article we use a commercial product called Connect Bridge. This is, in fact, what makes the Python / SharePoint integration possible, by allowing the data communication in a way that you are sure that you are not messing up the SharePoint side (and, trust me, this is VERY important). You can get a free trial for Connect Bridge, so you can try all this for yourself.
What is this "Connect Bridge"?
I'm glad you asked! Connect Bridge is a is an integration platform developed by Connecting Software that allows you to connect any software through ODBC drivers, JDBC drivers or Web Services. The general overview of the architecture of the tool is on this client-server scenario diagram.
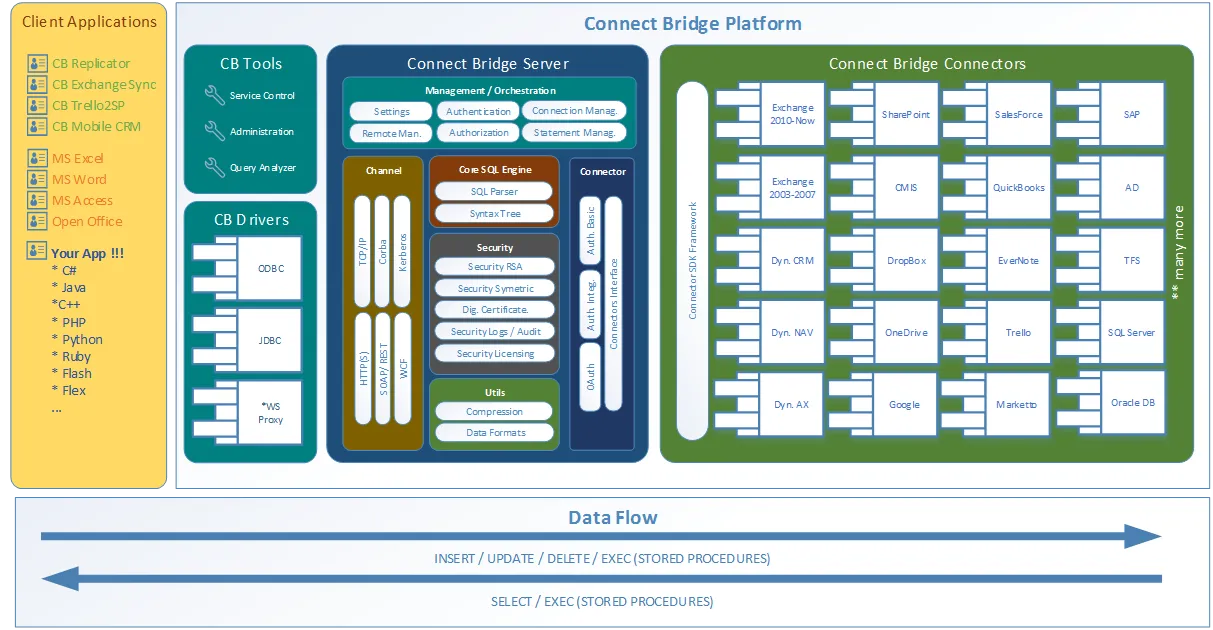
Connect Bridge integration platform architecture
As you can see on the architecture diagram, the tool can be used to access not only Microsoft SharePoint data from within your Python script, but you can also grab/put data from/to Microsoft Exchange and Microsoft Dynamics CRM among many others.
The aim - getting SharePoint data using Python
The aim of our work was to create a Python script that would allow us to talk to SharePoint via Connect Bridge.
We use SharePoint, but it is possible to use similar logic to connect to Microsoft Exchange or to a CRM like Salesforce or Dynamics.
Getting started...
Now let's start this tutorial! Our goal is to create a simple Python script that accesses a SharePoint instance. We assume the SharePoint instance already exists (make sure you have your login credentials at hand). These are simple steps you need to follow:
1. Request a free trial and install Connect Bridge
2. Install Python for Windows ver. 3.7+. Please note that to make writing, running & debugging my script easier we have used Liclipse 5.2.4 with the pydev plugin, but this is, of course, optional. You can use the editor of your choice.
3. Install pyodbc module 4.0.26+
4. Run Connect Bridge Management Studio and
4.1. Add an account for SharePoint (Accounts - Add account). This is where you will need those credentials we mentioned earlier.
4.2. Open the New Query option and then the Connection Browser. Find the SharePoint Connector and open it until you see the DefaultConnection. Right-click on it and choose Get Connection string. Then copy the ODBC connection string. You will need it to pass it on to the script.
4.3. Use the New Query option to test out a query that will access what you need in SharePoint. We will do an example query here, but this is where you should put in what it is that you are looking for in SharePoint. Once you have clicked New Query, open the Connection Browser. Find the SharePoint Connector and open it until you see the Tables option. You'll see that the schema contains a “table” called Site_Pages so we can construct our query as
SELECT UniqueId, ContentType, Created, Modified, ContentVersion FROM Site_Pages LIMIT 10;
to select the first 10 entries from SharePoint's Site Pages list. It is important to note that although it looks as if we are using a database directly, that is not the case.
Connect Bridge is accessing the API and then presenting it as if it was a database. Once you have your query, copy it, as you will also need it to pass it on to the script.
Hands on scripting!
The core and, at the same time, the only file in our solution is CBQuery.py. The full source code is below. Please focus on lines 70-92 which depict the core solution. A complete description of how this script works is below.
#!/usr/local/bin/python3.7

# encoding: utf-8

'''

CBQuery -- query data from, write data to SharePoint


CBQuery is a script that allows to run SQL queries via Connect Bridge ODBC driver


@author:    Ana Neto and Michal Hainc


@copyright:  2019


@contact:    ana@connecting-soiftware.com

@deffield    updated: 04.07.2019

'''


import sys

import os

import pyodbc


from argparse import ArgumentParser

from argparse import RawDescriptionHelpFormatter


__all__ = []

__version__ = 0.2

__date__ = '2019-07-04'

__updated__ = '2019-07-04'


DEBUG = 1

TESTRUN = 0

PROFILE = 0


class CLIError(Exception):

    '''Generic exception to raise and log different fatal errors.'''

    def __init__(self, msg):

        super(CLIError).__init__(type(self))

        self.msg = "E: %s" % msg

    def __str__(self):

        return self.msg

    def __unicode__(self):

        return self.msg


def main(argv=None): # IGNORE:C0111

    '''Command line options.'''


    if argv is None:

        argv = sys.argv

    else:

        sys.argv.extend(argv)


    program_name = os.path.basename(sys.argv[0])

    program_version = "v%s" % __version__

    program_build_date = str(__updated__)

    program_version_message = '%%(prog)s %s (%s)' % (program_version, program_build_date)

    program_shortdesc = __import__('__main__').__doc__.split("n")[1]

    program_license = '''%s


  Created by Ana Neto and Michal Hainc on %s.


  Licensed under the Apache License 2.0

  http://www.apache.org/licenses/LICENSE-2.0


  Distributed on an "AS IS" basis without warranties

  or conditions of any kind, either express or implied.


USAGE

''' % (program_shortdesc, str(__date__))


    try:

        # Setup argument parser

        parser = ArgumentParser(description=program_license, formatter_class=RawDescriptionHelpFormatter)

        parser.add_argument('connstr')

        parser.add_argument('query')


        # Process arguments

        args = parser.parse_args()


        query = args.query

        connstr = args.connstr


        conn = pyodbc.connect(connstr)

        cursor = conn.cursor()

        cursor.execute(query)

        while 1:

            row = None

            try:

                row = cursor.fetchone()

            except:

                print(sys.exc_info()[1])

                break

            if not row:

                break

            print(row)


    except KeyboardInterrupt:

        ### handle keyboard interrupt ###

        return 0

    except:

        print(sys.exc_info()[1])

        #indent = len(program_name) * " "

        #sys.stderr.write(program_name + ": " + repr(e) + "n")

        #sys.stderr.write(indent + "  for help use --help")

        return 2


if __name__ == "__main__":


    if TESTRUN:

        import doctest

        doctest.testmod()

    if PROFILE:

        import cProfile

        import pstats

        profile_filename = 'CBQuery_profile.txt'

        cProfile.run('main()', profile_filename)

        statsfile = open("profile_stats.txt", "wb")

        p = pstats.Stats(profile_filename, stream=statsfile)

        stats = p.strip_dirs().sort_stats('cumulative')

        stats.print_stats()

        statsfile.close()

        sys.exit(0)

    sys.exit(main())
Here is what our script is doing:
• Lines 71-80 focus on getting the variables connstr and query from the command line arguments input. For this we used the pydev’s argparse script template to make my life easier
• The variable connstr holds the ODBC connection string that we pass into the pyodbc module to create an ODBC connection (stored in conn variable)
• as next step we open a database cursor using the connection stored in conn
• Having the connection stored in conn we open a database cursor using conn
• We execute the SQL query (this is the query that was passed via the command line parameter named query)
• Finally, we use a while loop to read results from the cursor row by row. When cursor.fetchone returns None, we break the loop
• If an exception occurs during the ODBC fetch, we also break the loop and print the problem to output
• If the fetchone method succeeds and returns a data row, we print the raw data row as it is to the output. This was our choice for this demo, but please note this could be any kind of output…we could format as xml or json, csv… or any other kind of data-interchange format. We could also simply use the raw data row object to be in further code to perform custom tasks.
Running the CBQuery.py script
We know that our CBQuery.py accepts two positional command line arguments: connstr and query.
We need to copy these from Connect Bridge Management Studio as explained above (point 4).
Can we create a SharePoint contact list and write an entry?
Let’s now suppose we want to create a contact list in SharePoint and create a contact on that list. We basically need to follow the same process but change the query to use a "Stored Procedure". Again this "Stored Procedure" will, in fact, be accessing SharePoint via the API, but it is getting the data into the SharePoint you specified. Here is the query that we need to run:
EXEC SP_CREATE_TABLE 'MyContacts', 'This table was created using Connect Bridge', true, 'Contacts';
The query creates a new SharePoint list (MyContacts), with a description that will show in the quick launch bar of the SharePoint page.
Now we need to call the following query to update the Connect Bridge ODBC schema reflection of the SharePoint schema. So, our new “table” gets visible to the ODBC client.
EXEC SP_UPDATE_SCHEMA;
We can insert a contact entry into our contact list at this point.
INSERT INTO MyContacts (FirstName, LastName) VALUES ('Ana', 'Neto');
You should now be able to see our entry and our new SharePoint list in the SharePoint UI.
We can select the entry we just created by running the following query.
SELECT FirstName,LastName FROM MyContacts
Uploading & downloading of shared documents
For uploading a shared document, we will use the existing SharePoint list “Documents” and the "Stored Procedure" SP_INSERT_SHAREDDOCUMENT. The parameters it takes are:
• Shared documents table name
• Filename
• Folder (relative path, on the server)
• MIME type
• Data for the file
We can insert the document by running the following statement:
EXEC SP_INSERT_SHAREDDOCUMENT
    'Documents',
    'hello2.txt',
    '/Shared Documents/NewFolder',
    'text/plain',
    'SGVsbG8gV29ybGQ=';
If you want to check the presence of the folder beforehand, you can run the statement:
EXEC SP_ENSURE_FOLDER_PATH
    'Documents',
    '/NewFolder';
After running the SP_INSERT_SHAREDDOCUMENT we can check the presence of the document in the “Documents” table by running the statement:
SELECT Id,Name FROM Documents;We can also download the binary contant of a particular document from a particular document library by running the statement:
EXEC SP_SAVE_SHAREDDOCUMENT_BY_ID 'Documents', 2; At this point you can check the existence of the shared document in the SharePoint UI
Constraints
So far, we have been able to use the Connect Bridge tool only from Windows operating systems, because no ODBC Linux client library is available (and we are not sure If that is even possible). So be sure to play with your Python scripts on a Windows machine.
Conclusion
We have seen how accessing SharePoint data in Python can be easily done using the Connect Bridge integration platform. Now imagine that what you have seen in this article is possible also with Microsoft Dynamics CRM and Microsoft Exchange! Yes, with Connect Bridge this is possible and the way to do it is similar.
Who can I reach out to for questions?

By Ana Neto, technical advisor at Connecting Software.
“I have been a software engineer since 1997, with a more recent love for writing and public speaking. Do you have any questions or comments about this article? I would love to have your feedback, leave a comment below!"
Comments 1
Thank you for the clear explanation!