By the end of this article, you will know how to connect an SQL Server database to your trusted Microsoft Excel environment. All you need to support this integration is a device that can run Microsoft Excel, Microsoft Excel itself, and an SQL Server database to connect to. Simple, right?
This integration is particularly useful for businesses currently using Microsoft Excel as a customer database. This approach is common in small companies in their early stages. However, as businesses grow, a more efficient way of storing and retrieving data becomes necessary.
The logical next step from Excel spreadsheets is to move on to a database. If you want to stay in the Microsoft ecosystem, a Microsoft SQL Server database is the way to go. For now, we will consider an intermediate setup in which you already have the SQL Server database, but the users want to access its data from Excel using an existing data connection. Such a setup reduces the time spent on data management and is a step in the right direction.
However, if you need to apply any kind of business logic besides the connection from Excel to SQL, more steps are required. We'll discuss this type of connection right after our Connect Excel to SQL tutorial.
Let’s Connect Excel to SQL!
To start, we'll go through the step-by-step process of linking Excel to an SQL database. Our goal is to get data from the database to Excel.
Step 1 - Open Excel
Open Excel and then the Excel workbook where you want to place the data.
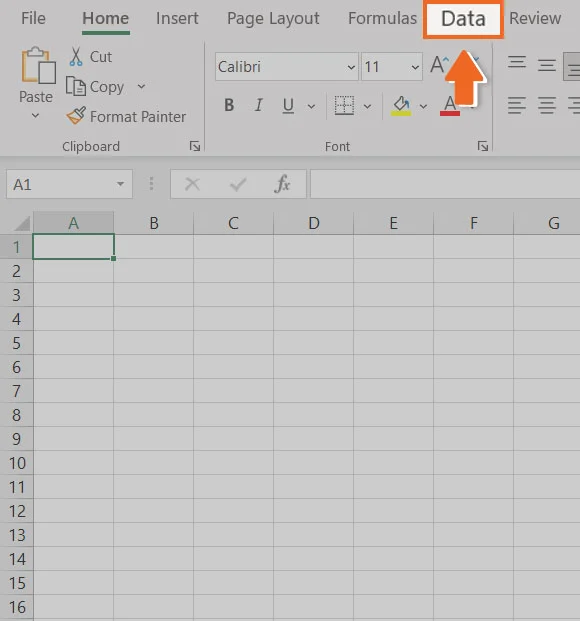
Step 2 - Open the Data tab
Select the Data tab.
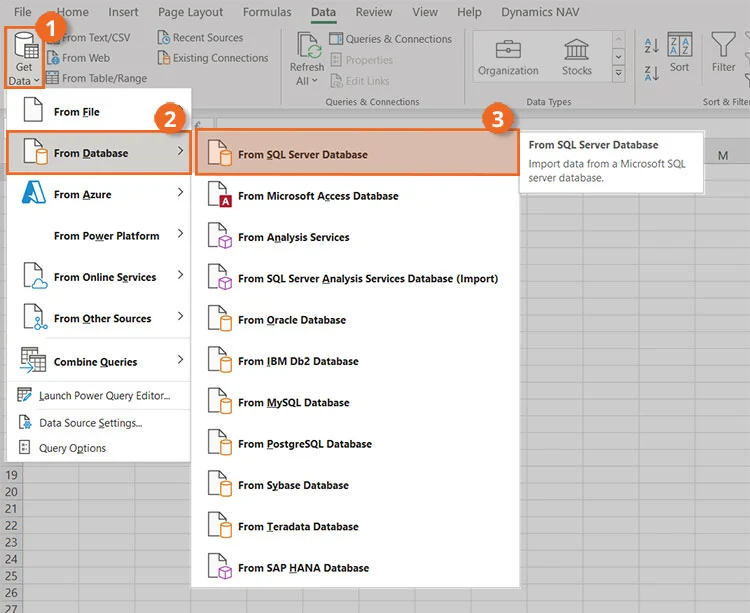
Step 3 - Get Data From SQL Server Database
Click on the Get Data menu, select the From Database option, and select From SQL Server Database to establish a data connection.
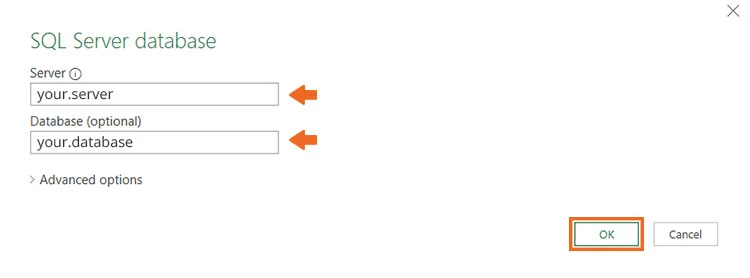
Step 4 - Connection Details
You should see the dialog box below. Enter the details of the SQL database you wish to connect to:
- Its server name (you can include :portnumber if applicable)
- A database name (optional at this point; you will be able to select the database from a list of databases in a future step).
Once you are done, press OK.
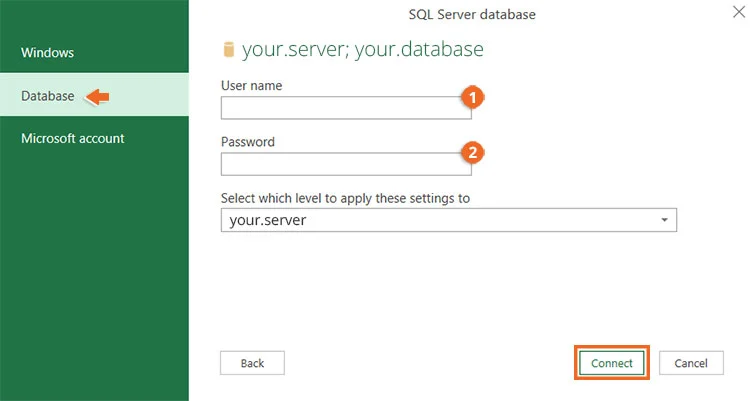
Step 5 - Authentication
In the next step, you should fill in your credentials. On the left sidebar, you can select Windows authentication, authentication with your Database credentials, or Microsoft account authentication.
We will select the Database option for this demo connection. Enter your SQL database credentials, i.e. the Username and Password you set for the SQL Server database, ensuring the proper data authentication.
As for the Select which level to apply these settings to field, it should be the same as the server address for the database you are trying to connect to, which you entered during step 4.
When you are done, press Connect.
Step 6 - Select Table
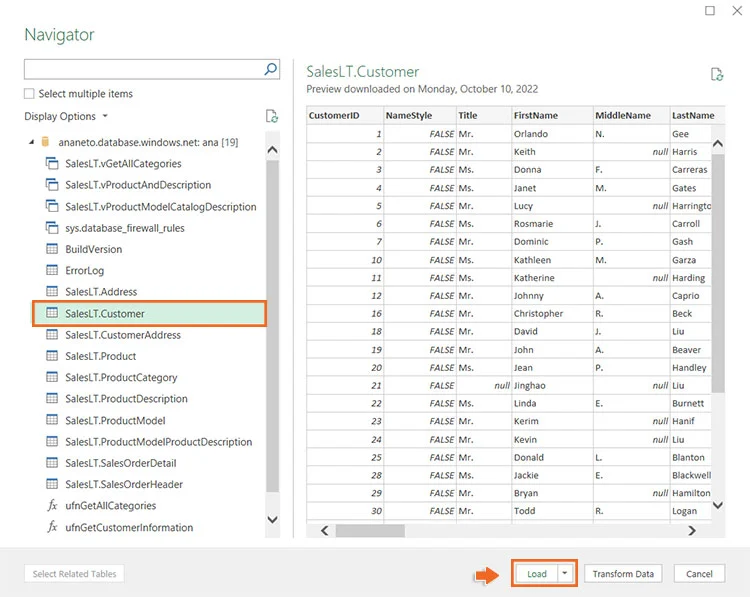
You are almost there! For our last step, you will be using the Navigator window to select the data source, such as tables or database values. Here, you will see a list of the tables that are contained within your SQL Server database.
For this demonstration, we will choose a database table that encloses fictitious customer information of a fictitious company. Once you have selected the table you wish to connect to, all you need to do is press the button Load.
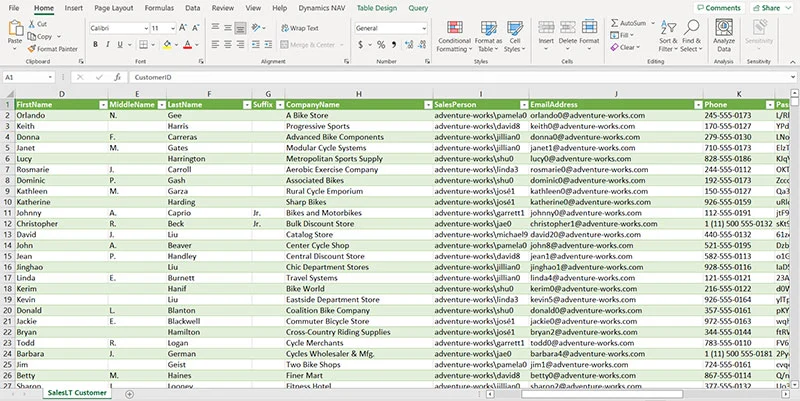
Et voilà! You just connected Microsoft Excel to an SQL Server Database. Once you save your Excel Workbook, this connection is persistent. This means you can close Excel, and the data connection will still work when you open it again.
Conclusion
We hope this simple tutorial helped you connect Excel to SQL successfully, as this can serve as a stepping stone from the classic Excel spreadsheet database that we see across many small businesses to a more robust solution.
However, as we mentioned at the beginning of the article, if you are looking for a way to connect Excel to SQL, that can cover business rules and maximize its capabilities, we suggest you have a look at Connect Bridge.
Connect Bridge is our powerful software integration platform. Essentially, it eliminates the need to use software API by using SQL syntax instead, and this is why it`s so unbelievably handy! Make sure you check the article we wrote for CRM Software Blog explaining how you can connect Excel to SQL, Dynamics 365, SharePoint, and more by using our platform. If you prefer, feel free to reach out to us directly! We are more than happy to assist.

About the Author
By Ana Neto, technical advisor at Connecting Software.
“I have been a software engineer since 1997, with a more recent love for writing and public speaking. Do you have any questions or comments about this article? I would love to have your feedback, leave a comment below!"